
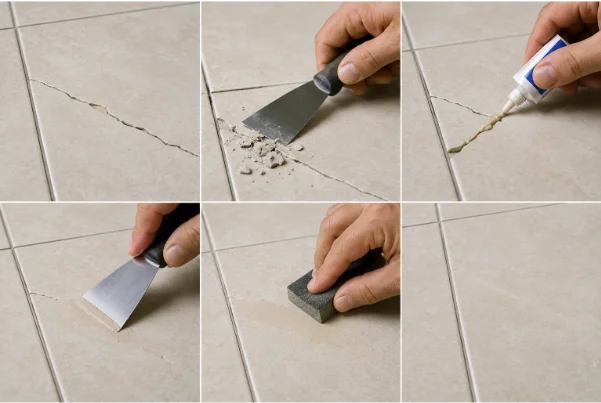
A small chip in a ceramic floor tile can be frustrating, especially when the rest of the floor is in good condition. A dropped object, a hard impact, or years of normal use can knock a small piece from the surface and leave a noticeable spot.
The good news is that a minor chip does not always require removing the entire tile. If the tile is firmly attached, the damage is shallow, and there are no cracks spreading from the chipped area, a suitable tile repair compound can often restore the surface and make the damage much less noticeable.
The repair is mainly about preparation and patience. The damaged area needs to be clean and dry, loose fragments need to be removed, and the repair material needs to be applied in thin layers rather than piled into the chip. Just as importantly, you need to know when a chip is too large or the tile is too damaged for a simple surface repair.
Here is how to assess and repair a small chip in a ceramic floor tile without unnecessarily replacing the entire tile.
What Usually Causes Chips in Ceramic Floor Tiles?
Ceramic floor tiles are hard and durable, but their glazed surfaces can still be damaged by sharp or heavy impacts.
Dropping a metal tool, cookware, heavy object, or piece of furniture can break a small section from the glaze. Moving furniture across the floor can also cause damage if something hard strikes an exposed tile edge.
Chips can occur along corners and edges, where the tile is particularly vulnerable to impact. A chip in the middle of a tile usually results from a direct impact, while damage around an edge may sometimes be related to an installation or movement issue.
The size and shape of the damage matter.
A small, shallow chip with clean edges is generally a better candidate for cosmetic repair. If the tile has a crack extending away from the chip, moves under pressure, has multiple damaged areas, or has a large section missing, filling the chip may only disguise part of the problem.
Before buying repair material, look closely at the surrounding tile. You want to make sure you are dealing with surface damage rather than a tile that has lost its structural integrity.
Can You Repair a Small Tile Chip Yourself?
Yes. A small ceramic tile chip is usually a manageable DIY repair if the surrounding tile is stable and undamaged.
The work is more like careful surface restoration than a major flooring repair. You do not normally need to remove the tile, disturb the grout, or use power tools.
The repair may take less than an hour of hands-on work, but the total time can be longer because the filler or repair compound may need to cure before it can be sanded or painted.
The biggest challenge is matching the repaired area to the existing tile. A repair can restore the missing material without making the damage completely invisible. Glazed ceramic tiles can have subtle variations in color, texture, and sheen that are difficult to reproduce exactly.
If the chip is very small and located in a low-traffic area, a careful repair can produce a good visual improvement.
Tools and Materials You May Need
The exact products depend on the type and color of your tile, but a basic repair may require:
- Ceramic or porcelain tile repair epoxy or suitable two-part repair compound
- Small mixing surface if the repair product requires mixing
- Fine-point applicator, toothpick, or small craft tool
- Razor scraper or utility knife for removing loose fragments
- Fine-grit sandpaper
- Clean microfiber cloth
- Mild household cleaner
- Masking or painter’s tape
- Matching touch-up paint or a repair colorant, if recommended for the chosen repair system
- Disposable gloves
Choose a repair product intended for ceramic or tile surfaces rather than ordinary wall filler or drywall compound.
If the chip is on a glazed floor tile, the repair material also needs to tolerate normal floor use after it has fully cured.
Read the product instructions before mixing anything. Different repair compounds have different mixing ratios, working times, curing periods, and preparation requirements.
Before You Start
Clean the floor around the damaged tile so dirt and grease do not interfere with the repair.
Do not start while the tile is damp. Moisture trapped inside the chip or along its edges can interfere with some repair products.
Examine the damage under good lighting.
Look for loose ceramic pieces, sharp edges, cracks, discoloration, or evidence that the chip extends deeper into the tile.
Run a fingertip carefully over the area without pressing hard. You are checking whether there are loose fragments or sharp edges, not testing the tile’s strength.
If the damage is near a doorway, furniture leg, or another area that receives repeated impact, consider whether the cause needs to be addressed after the repair.
For example, if a heavy chair repeatedly strikes the same tile edge, repairing the chip without changing how the chair contacts the floor may simply lead to another chip.
Step-by-Step: How to Repair a Small Chip in a Ceramic Floor Tile
Step 1: Clean the Damaged Area
Begin by cleaning the tile with a mild cleaner suitable for the flooring.
Remove dust, grease, floor-care residue, and loose debris from the chipped area.
Wipe the surface with a clean cloth and allow it to dry completely.
Avoid leaving cleaning chemicals concentrated inside the chip. If necessary, wipe the area again with a clean, slightly damp cloth and then allow it to dry thoroughly.
The repair material needs a clean surface to bond properly.
Step 2: Remove Loose Ceramic Fragments
Inspect the chipped area closely.
If there are tiny pieces of ceramic that are already loose, remove them carefully with a suitable tool.
Do not enlarge the chip unnecessarily. The goal is to remove material that is already unstable, not to carve away additional tile.
A razor scraper or utility knife can sometimes help with very small loose fragments, but work carefully. Ceramic edges can be sharp.
If a piece is firmly attached, leave it alone.
The cleaner and more stable the edges are, the easier it will be to create a neat repair.
Step 3: Protect the Surrounding Tile
If the chip is small, you may not need extensive masking.
However, painter’s tape around the damaged area can help prevent repair compound from spreading onto the surrounding glazed surface.
Leave enough exposed area for the repair material to bond properly.
This is particularly helpful when the chip is close to a grout line or when you are working with a small amount of material.
Do not press tape into the actual damaged area.
Step 4: Prepare the Repair Compound
Prepare the ceramic-tile repair material according to its instructions.
Some products are premixed. Others require two components to be combined.
Follow the manufacturer’s specified ratio rather than estimating.
Only mix as much as you can use within the product’s working time. Epoxy and similar materials can become difficult to spread once they begin curing.
If you are trying to match a colored tile, this is also the point where any compatible colorant should be prepared according to the repair product’s instructions.
Do not experiment with random paints or household adhesives inside the chip.
Step 5: Fill the Chip
Use a toothpick, small applicator, or another appropriate tool to place a small amount of repair compound into the damaged area.
Start with less material than you think you need.
Press the compound gently into the deepest part of the chip first. Then work toward the edges.
The objective is to fill the missing material without creating a large mound above the surrounding tile.
If the chip is deeper than it is wide, it may be better to build the repair gradually rather than filling the entire cavity with one thick application. Follow the repair product’s instructions regarding application thickness and curing between layers.
Take your time around the edges. A neat transition will make the finished repair less noticeable.
Step 6: Level the Repair
Before the repair compound fully cures, carefully smooth the surface as directed by the product manufacturer.
The finished repair should be approximately level with the surrounding tile.
Do not aggressively scrape across the surrounding glaze.
If you remove too much compound, the repaired area may remain recessed. If you leave too much, the raised patch may become more noticeable after curing.
This is one of the most important stages of the repair. Work slowly rather than trying to correct the entire surface in one motion.
Step 7: Allow the Repair to Cure
Leave the repaired tile undisturbed for the full curing period specified by the product.
Do not walk across the repair simply because the surface feels firm after a short time.
Floor repairs can experience pressure, friction, and cleaning soon after installation, so the material needs enough time to develop its intended strength.
Keep water and cleaning products away from the repair until the manufacturer’s instructions say the surface can be exposed to them.
Curing time varies between products. Do not assume that every epoxy or tile repair compound requires the same amount of time.
Step 8: Smooth Any Raised Area
Once the repair has cured enough for sanding or finishing, inspect the surface under good lighting.
If the repaired material sits slightly higher than the tile, carefully smooth it using the method recommended by the repair product.
Use fine-grit sandpaper and work only on the repaired area when sanding is appropriate.
Avoid aggressive sanding. The surrounding glaze can become scratched or dull if you move abrasive material beyond the repair.
Wipe away the dust with a clean cloth when finished.
Step 9: Improve the Color Match if Necessary
A repaired chip can sometimes remain visible because its color or shine does not exactly match the surrounding tile.
If the repair product is designed to accept a compatible color coating, apply it according to the manufacturer’s directions.
Use very small amounts.
It is generally easier to add color gradually than to apply too much and try to remove it.
Do not expect a perfect match with every tile. Highly patterned, textured, metallic, or strongly glazed surfaces can be particularly difficult to reproduce.
For a small repair, the goal is usually to make the damage substantially less noticeable rather than create a completely indistinguishable surface.
Step 10: Remove the Tape and Inspect the Finished Repair
If you used painter’s tape, remove it carefully.
Inspect the repair from several angles.
Run a clean fingertip lightly over the area once the material is fully cured. The repaired surface should not have an obvious sharp edge or raised lump.
Check that the surrounding glaze has not been scratched.
Finally, compare the repair in both natural and artificial light. A patch that looks nearly invisible in one type of lighting can appear more obvious in another.
What If the Simple Fix Doesn’t Work?
If the repair compound does not bond, first check whether the surface was properly cleaned and completely dry.
Flooring products can leave behind wax, polish, soap residue, or other contaminants that interfere with adhesion.
If the repair remains soft after the expected curing period, check the product instructions and the environmental conditions. Temperature, moisture, application thickness, and incorrect mixing can affect curing.
If the repaired area keeps breaking away, the chip may be deeper or more extensive than it first appeared.
Inspect the tile again for cracks extending beyond the original damage.
A repair compound is also unlikely to solve a tile that moves when you walk across it. Movement can indicate a problem with the tile installation or the substrate underneath. In that situation, replacing the tile or correcting the underlying installation may be necessary.
If the chip is on a corner and continues to lose pieces, check whether the tile is being struck repeatedly by furniture, doors, or other objects.
The repair material can restore the missing section, but it cannot prevent another impact.
Common Mistakes to Avoid
Using Ordinary Wall Filler
Drywall filler and general-purpose wall spackle are not designed for the same conditions as a floor tile.
Flooring experiences foot traffic, abrasion, cleaning, and occasional impact. Use a repair material intended for the tile surface and application.
Applying Too Much Material
A large mound of repair compound is harder to finish and more likely to remain visible.
Build the repair carefully and keep it close to the original tile surface.
Skipping Surface Cleaning
Even a small amount of grease or floor-care residue can interfere with adhesion.
Clean the area properly and allow it to dry.
Sanding the Tile Around the Repair
The glazed surface surrounding the chip may scratch or lose its sheen when exposed to abrasive material.
Keep sanding controlled and limited to the repair area when the product permits sanding.
Walking on the Repair Too Soon
A repair compound that feels firm is not necessarily fully cured.
Follow the manufacturer’s curing instructions before putting normal floor traffic on the repaired area.
Repairing a Cracked Tile as if It Were Only Chipped
A chip and a structural crack are different problems.
If a crack extends across the tile, especially from the chipped area toward an edge or corner, surface filler may not provide a lasting solution.
Ignoring the Cause of the Damage
If a heavy object caused the chip, consider how to prevent another impact.
If the tile is loose or flexes under pressure, investigate the installation instead of repeatedly filling surface damage.
When You Should Call a Professional
A small cosmetic chip generally does not require professional help.
Professional assistance becomes more appropriate when the damage is extensive, the tile is cracked, the tile moves, or the surrounding floor has signs of failure.
If several nearby tiles are cracked or loose, the problem may involve the substrate rather than one damaged tile.
You should also consider professional help if water has entered below the flooring or if you suspect damage beneath the tile.
Special care may be appropriate with older flooring where the materials or installation methods are unknown. Avoid disturbing materials if you suspect they could contain hazardous substances.
If the damaged tile is part of a complex patterned floor and an exact replacement or color match is important, a professional tile installer may be able to provide a better cosmetic result.
How to Prevent Ceramic Tile Chips From Coming Back
The easiest way to prevent another chip is to identify what caused the first one.
Use protective pads beneath furniture that may contact the floor. Lift furniture instead of dragging it across the tile whenever possible.
Be particularly careful when moving heavy appliances or metal objects over ceramic flooring.
Do not drop tools or hard objects onto the tile.
Keep an eye on tile edges near doorways and transitions because these areas can receive more impact than the center of the room.
If a tile sounds hollow, moves under pressure, or develops cracks, do not assume that surface damage is purely cosmetic. An unstable tile can be more vulnerable to additional damage.
Regular cleaning also helps you spot small changes before they become difficult to repair. When the floor is clean, small cracks, chips, and loose areas are easier to notice.
Final Check
After the repair has fully cured, inspect the tile closely.
The repaired area should be filled, reasonably level with the surrounding surface, and firmly bonded.
There should be no loose fragments around the chip and no obvious sharp edge that could catch on footwear or cleaning equipment.
Walk normally over the area and pay attention to whether the tile itself remains stable.
If the repair remains intact and the tile does not move or show signs of spreading cracks, the small chip has likely been successfully stabilized.
Remember that a repaired chip may still be visible when viewed closely. That does not necessarily mean the repair failed. The practical goal is to restore the damaged area and make it less noticeable while keeping the tile sound.
Frequently Asked Questions
Can a small chip in a ceramic floor tile be repaired?
Yes. A small, shallow chip in a stable ceramic tile can often be repaired with a suitable tile or ceramic repair compound. The repair is mainly cosmetic, so the condition of the underlying tile still matters.
What should I use to fill a chipped ceramic tile?
Use a repair product specifically designed for ceramic tile or a compatible two-part repair epoxy. Ordinary drywall filler or household glue is not an appropriate substitute for a floor-tile repair product.
Can I repair a chipped tile without replacing it?
Often, yes. If the tile is firmly attached and has only a small chip without structural cracking, a surface repair may be sufficient. A severely cracked, loose, or extensively damaged tile is a different situation.
Will a repaired tile chip be completely invisible?
Not always. The final appearance depends on the tile’s color, pattern, texture, glaze, lighting, and the quality of the color match. A careful repair can make a small chip much less noticeable, but an exact match may be difficult.
How long does a ceramic tile chip repair take to dry?
It depends on the repair product. Some materials become firm relatively quickly, while others require significantly longer to cure. Follow the manufacturer’s instructions rather than relying on how the surface feels.
Can I use nail polish to repair a chipped floor tile?
Some people use household coatings for very minor cosmetic marks, but they are not a dependable general solution for floor-tile chips. A product designed for ceramic or tile repair is a better choice when the missing material needs to be rebuilt.
When should I replace a chipped ceramic floor tile?
Replacement is usually worth considering when the tile has a significant crack, extensive missing material, movement, repeated damage, or an underlying installation problem. A small isolated surface chip is usually a better candidate for repair.
Final Thoughts
A small chip does not automatically mean that a ceramic floor tile needs to be removed. If the tile is firmly attached and the damage is limited to a small area, a suitable repair compound can restore the missing material and improve the appearance.
The most important parts of the job are cleaning the surface, removing only loose material, applying the repair compound carefully, allowing it to cure fully, and avoiding damage to the surrounding glaze.
If the tile is cracked, loose, repeatedly damaged, or sitting over a problem area, stop treating it as a simple cosmetic chip. The underlying issue needs to be addressed first.
A careful repair can extend the useful life of an otherwise sound tile without turning a small chip into a much larger flooring project.